This post may contain affiliate links. Please read our disclosure policy.
Grilled corn is one of the best things about summer! This easy recipe will guide you through how to grill corn on the cob! Learning how to grill corn on the cob is a great skill to have. Included are instructions to grill corn with the husks and without the husks.
One of my favorite recipes for the grill happens to be sweet corn on the cob. It’s simple, yet so delicious and a summer staple! Over the years I have played around with different methods of grilling corn. I’ve tried cooking the corn with the husks on and without the husks. I’ve also tried grilling the corn in foil.
The method I am sharing with you today is the one that I come back to over and over again. I prefer grilled corn with the husks on, but I will also include instructions for how to grill corn with the husks removed. Whether you are hosting a cookout or you need a late summer side dish, grilled corn on the cob in all its buttery glory is THE BEST! Let’s get grilling! ❤️Ashley

Why Grill Corn on the Cob?
There are a variety of reasons that people like to cook corn on the cob on the grill. I am going to summarize my top three reasons:
- The taste: is there anything better than sweet corn that’s slightly smoky from the grill? You just can’t get the same taste when cooking corn any other way.
- The texture: towards the end of the grilling process, I like to pull back the husks and place the corn directly on the grill to char it a bit. Not everyone loves the texture of charred corn on the cob, but I sure do! Just a little bit – not too much!
- The simplicity: I love being able to cook an entire meal on the grill. Between the taste, the texture, and the simplicity of cooking a summer meal on the grill, the answer as to why you should grill corn on the cob is easy!

Preparing Corn on the Cob for the Grill (with husks):
Arguably the most important step when it comes to the process of grilling corn on the cob is preparing the corn for the grill.
- Gather fresh corn on the cob – choose corn that has bight green leaves. Locally grown sweet corn is always a great option if it’s available to you – it tends to be sweeter and juicier.
- Remove a few of the outer husks – but make sure to leave enough of them intact so that the corn is still covered.
- Remove the silk – to do this, gently pull the husks down but do not rip them off. Remove the silk from the corn, then put the husks back in place so that the corn is covered.
- Soak the corn – clean your sink or use a large bowl filled with water and soak the corn for 20-30 minutes. This will help prevent the husks from burning (although they will still get the charred look)
Preparing Corn on the Cob for the Grill (without husks):
- Gather fresh corn on the cob – choose corn that has bright green leaves. Locally grown sweet corn is always a great option if it’s available to you.
- Remove the husks and silk – rinse the corn under water and use a vegetable brush if you have one, to help remove the silk.
- Brush with olive oil or butter – when the husks have been removed, it is helpful to slather a layer of butter or oil on the corn to help prevent the corn from drying out.

How to Grill Corn on the Cob (with husks)
After you have prepared the corn and have allowed it to soak, it’s time to grill! Here’s how to grill corn on the cob, with the husks in tact.
- Pre-heat your grill to medium heat – around 350 degrees.
- Remove the corn from the water and shake off excess water.
- Place the corn on the grill (with husks in-tact) and cook for 15-20 minutes. Rotate every 5 minutes until corn is tender.
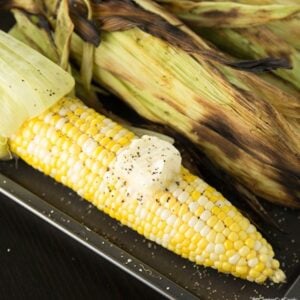
- Remove the corn from the grill, or pull the husks back and place the corn directly on the grill for a few minutes so that the corn can char a bit.
- Butter the corn and season with salt and pepper before serving.
How to Grill Corn on the Cob (without husks)
Perhaps you purchased corn from the grocery store that has already had the husks and silks removed, so you are left with no option but to grill the corn without the husks. Here’s how to do that:
- Preheat the grill to medium-high heat — around 375-400 degrees F.
- Place the corn on the grill grates. Grill for 10-15 minutes, making sure to rotate the corn every few minutes or so.
- When the corn is tender, remove it from the grill. Add additional butter, salt and black pepper to taste.
Buttering Corn on the Cob.
I always spread butter over the corn while it’s still hot and sprinkle it with salt and pepper. You can use softened butter or melted butter. Aside from salt and pepper, feel free to get creative with seasonings and herbs.
One of the most important aspects to successfully grill corn is to choose fresh, juicy, ripe corn. Make sure the corn you choose has bright green husks. I like to pull back part of the husk in the grocery store to make sure that the ear of corn I am buying looks okay.
Grilled corn is definitely one of the best things about summer! Be sure to keep an eye on the corn as it cooks so that it doesn’t burn. The lightly charred texture of corn that is grilled is lovely, but you do not want the corn to burn.
This recipe is super easy and the end result should be perfectly grilled corn. Enjoy!
More Corn on the Cob Recipes…
If you do not want to grill corn on the cob, I’ve got recipes for three additional methods you can use to cook corn on the cob.
- How to boil Corn on the Cob
- Slow Cooker Corn on the Cob
- How to Make Corn on the Cob in the Microwave
If you try this recipe for Grilled Corn on the Cob, please leave a comment and let me know what you think. I love to hear from you. Enjoy!
How to Grill Corn on the Cob
Ingredients
- 4-8 ears sweet corn on the cob, husks still in tact
- kosher salt and course black pepper to taste
- butter to taste
Instructions
Grilling Corn with Husks
- Prep the corn by removing several of the outer husks, but leaving enough of them in-tact so that the corn is still covered.
- Carefully pull the remaining husks down to expose the corn, but do not rip them off. Remove all of the silk from the corn, then put the husks back in place so that the corn is covered.
- Fill a clean sink with water and soak the corn for 20-30 minutes. This will help prevent the husks from burning (although, they will still get the charred look).
- Pre-heat your grill to medium heat, around 350 degrees. Remove the corn from the water and shake off the excess water.
- Place the corn, with the husks still in tact on the grill and cook for about 15-20 minutes. Rotate the corn every 5 minutes so that all sides can cook.
- At this point you can remove the corn from the grill, or you can pull the husks back and place the corn directly on the grill if you’d like a charred look. Just be sure not to over-cook the corn.
- Allow the corn to cool for a few minutes before carefully removing the husks. This part can be a bit messy. Spread butter over the warm corn and season with salt and pepper. Serve immediately.
Grilling Corn without Husks
- Prepare the corn for the grill by removing the husks and silk. Rinse the corn under cold water and use a vegetable brush (if you have one) to help remove the silk.
- Brush the ears of corn with olive oil or butter to help prevent the corn from drying out or sticking to the grill grates.
- Preheat the grill to medium-high heat (around 375-400 degrees F).
- Place the corn on the grill grates and grill for 10-15 minutes, or until the corn is tender. Rotate the corn every few minutes so that it cooks evenly and doesn't burn.
- Remove the corn from the grill and allow it to cool for a few minutes before adding additional butter, salt and black pepper to taste.